header photo

Wednesday, January 27, 2010

Intel Core i5 750 Overclock with Gigabyte QuickBoost

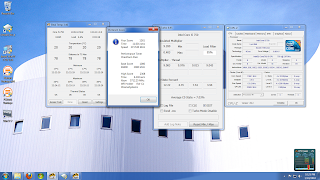
I dove into the realms of overclocking today with Gigabyte's included overclocking tool that came with my motherboard. It is a very easy way to overclock although I could see one getting into trouble by using this utility. The tool has three settings: faster, turbo, and twin turbo. Due to the fact that I still only have the stock Intel cooler, I limited myself to the faster and turbo options.

Gigabyte QuickBoost Utility

  • Baseline
    • Base Clock: 133MHz
    • 4 thread max multiplier: 21
    • CPU clock: 2798 MHz
    • CPU voltage: 1.20V
    • 100% load temp: 64
    • Intel Turbo mode: on
    • Memory clock: 1333MHz
  • Faster
    • Base Clock: 140MHz
    • 4 thread max multiplier: 21
    • CPU clock: 2940 MHz
    • CPU voltage: 1.20V
    • 100% load temp: 66
    • Intel Turbo mode: on
    • Memory clock: 1400MHz
  • Turbo
    • Base Clock: 150MHz
    • 4 thread max multiplier: 21
    • CPU clock: 3150 MHz
    • CPU voltage: 1.23V
    • 100% load temp: 69
    • Intel Turbo mode: off
    • Memory clock: 1500MHz
  • Twin Turbo (Did not test)
    • Base Clock: 200MHz
    • 4 thread max multiplier: 19
    • CPU clock: 3800 MHz
    • CPU voltage: NA
    • 100% load temp: NA
    • Intel Turbo mode: off
    • Memory clock: NA

I was nervous about selecting the different settings since the utility would not provide voltage and memory clock information. The turbo mode took my memory from its stock 1333MHz to 1500MHz. Although my memory happens to be able to run at those speeds, I did not know where it would end up until the computer restarted with the settings saved to the bios.


Supreme Commander Benchmark
I ran through the Supreme Commander benchmark at the baseline, faster and turbo settings to see if any gains in performance can be seen. I ran the benchmark at 1920x1080 resolution. Results are below.

Unfortunately, it seems that no gain in performance can be seen according to the average frame rates. It is interesting how the baseline settings resulted in the highest minimum frames per second. I do not understand this at all. It seems though that this Core i5 750 can handle the stress of this game very well.

Sunday, January 24, 2010

MSI ATI 5770 Overclocking, 3DMark Vantage, S.T.A.L.K.E.R.: Call Of Pripyat Benchmark, Supreme Commader, DiRT 2

I explored overclocking a MSI ATI 5770 seaweed edition with the use of MSI's Afterburner program, MSI's Kombuster GPU stresser (based on Furmark)  and 3DmarK Vantage on the performance setting. Unfortunately I currently do not have any game benchmarks to run yet.

The stock GPU clock rate is 850MHz with a memory clock rate of 1200MHz. I explored stability with the Kombuster program and ran 3Dmark Vantage at two different overclocks. The highest overclock that I reached that seems to be stable is a core clock of 950MHz and a memory clock of 1400MHz. Temperatures never exceeded 65C and the fan only reached 41%. The maximum that the afterburner tool can overclock to seems to be a core clock of 960MHz and a memory clock of 1445MHz. While stressing the GPU at this level, I experienced stability issues; screen started flashing and the mouse pointer became garbled.


3Dmark Vantage
3Dmark Vantage on the performance setting scores, as well as the individual CPU and GPU scores at baseline and two overclocks.


The baseline 3Dmark score was 8365 while the highest achieved overclock score reached 9222 resulting in a 10% increase.

S.T.A.L.K.E.R.: Call Of Pripyat Benchmark
First game benchmark used is S.T.A.L.K.E.R.: Call Of Pripyat Benchmark. Resolution is 1920x1080 using DX 11 and on the medium preset. Since the benchmark reports four different cases, the absolute minimums are presented below while the averages represented below are averaged evenly across all four cases resulting in the numbers below.

Unfortunately, according to this benchmark, overclocking might not be worth it. Average frames rates are already very playable and overclocking only adds ~5 FPS. Overclocking only increases the minimum frame rate by 1.5 FPS.

Supreme Commander Benchmark
I recently acquired supreme commander and ran the benchmark at the three overclock levels I have achieved with my ATI 5770. This game is highly CPU dependent for the simulation and AI calculations needed.
 
The results seem to show that this graphics card will run Supreme Commander fine without the need to overclock. This game is definitely limited by my CPU even though it is a core i5 750. It will be interesting to see how the results scale with CPU overclocking or increasing the resolution and image options.

DiRT 2 Benchmark
I finally got around to using DiRT 2 to benchmark the various overclock levels that I have achieved. DiRT 2 came with my graphics card. The game is not appealing to me and since it came with my card, I have to use Steam. I find Steam annoying and will promptly uninstall it after I am finished using DiRT 2 as a benchmark.

 The benchmark was set on a resolution of 1920x1080 with 4xAA and everything else on the "high" setting. The results are shown below.


 The game is very playable with the minimum frame rate never dropping below 30 FPS. Overclocking does improve the average frame rate by 4 FPS but since the game is already above 30 FPS, there is no difference in game play. Overclocking this card seems to result in little benefit.
 

[H]ardOCP's ATI 5770 overclocking results concluded with a maximum  core of 960MHz and a memory clock of 1400MHz. My results came fairly close to this. Tom's Hardware results only hit a core of 895MHz and a memory clock of 1430MHz.

Saturday, January 23, 2010

Core i5 750 Turbo Boost Explored

In order to explore the turbo boost function of the core i5 750, I used Prime95 64bit to experiment with using different numbers of workers and its effect on the CPU multiplier. The i5 is at its stock base clock rate of 133MHz and turbo boost varies the CPU multiplier from 9x to 24x depending on the loading of the CPU. I should have turned off cores that were not being used to fore the threads to stay on one core. It seems that Prime95 worker's threads jump from core to core when only 1, 2, and 3 workers were being used. Due to this, the multiplier jumped around as well so in the graph below, the maximum hit multiplier is shown as well as the maximum temperature after running Prime for ~30 minutes.


Turbo boost allows for the processor to vary its CPU multiplier from 9x to 24x depending on the number of threads which leads to a clock rate range from 1199.2MHz to 3197.7MHz! I wonder why inlet advertises the clock rate at 2.66GHz when at fully loaded it runs at 2.8GHz and can hit 3.2GHz by overclocking itself?

Wednesday, January 20, 2010

Testing, Temps, Fans

I finally got myself over to microcenter to get a 3 pin fan extender and a new fan so the front fan that came with the case now works and I added an intake fan that blows fresh air across the ram chips.


Pretty blue LED fan in the front! Blows cool air across the hard drive and to the graphics card.


Cooler Master fan blowing fresh air across the ram.


After installing the fans, I used Prime95 64bit to stress the CPU to see if its stable. I did not do any overclocking yet. I also recorded the temperatures of the CPU at idle and max load after 1 hour of Prime95. I used Realtemp 3.40 to monitor the temperatures and ran the programs benchmark.

idle temp: ~20C
100% CPU Load (2792.6MHz): 62C
Realtemp: 3.40 XS Bench Score: 1261

Its interesting how the Core i5 750 is marketed to run at 2.67GHz at a 20x multiplier but due to the chip's turbo function, it runs at 2.79GHz at a 21x multiplier.


Idle Temps.


100% CPU Load temps.


Realtemp 3.40 XS Score.

Wednesday, January 13, 2010

OS, drivers, bios, and performance

Now that all the hardware is assembled its time to test it! The system posted into the bios on the first try! While in the bios, make sure that the system is recognizing all the hardware in your system and take note of the bios version. If the bios is not the latest one, I suggest updating it to the latest and greatest before installing the operating system. In my case, I had to update mine. I used Gigabytes Q-Flash utility to update the bios from a usb flash drive. It was very easy to do and worked the first time!

Next I installed the OS, in my case Windows 7 64bit Home Premium Edition. Once into the OS, I installed all the latest drivers for the hardware attached to my system from the internet. I did not bother with any of the driver CDs that came with all the parts since they were all old versions.

After much instillation and several system reboots, I had Windows 7 functioning beautify. I performed some quick benchmarks to see where my system is at and identify any problem areas.


Here is my Windows Experience Index score.  Looks pretty darn good. Only thing suffering is the hard drive performance. Maybe one of these days I'll get a solid state drive (SSD) and boost the performance.


I also tried out PCMark Vantage Basic Trial 64-bit 1.0.1.0 which was limited to a resolution of 1024 x 768. It gave me a score of 7698. Comparing that score to some recent Tom's Hardware SBM, my $1000 PC is in line with their $1300 December 2009 SBM PC.

I'll try to do some more benchmarks and a little overclocking....got to get a better cooler first though.

Some good Tom's Hardware links:

Efficiency Explored: What's The Perfect Clock Rate For Your Core i5?

Troubleshooting Windows 7 With Microsoft's Built-In Tool

Monday, January 11, 2010

Graphics, hard drive, DVD drive, and Mobo

Now its time to install everything into the case and wire it together! First I installed the SONY Optiarc Black 24x DVD+R drive and the Western Digital Caviar Black 1TB hard drive into the case using the case supplied instructions. This case makes installing the DVD drive very easy with the use of the quick installation pins, although I did use screws as well because the pins did not hold the drive securely. Installing the hard drive was a pain due to the need to remove the hard drive assembly from the case to be able to access the screws to install the hard drive. Next I installed the motherboard into the case using the supplied standoffs. Make sure to be carefull not to damage the motherboard while installing and use static protection! Next I installed the MSI ATI Radeon HD 5770 which was pretty easy with the quick card locks on the case, although they seem cheap. Hopefully they will support the card well enough. Finally I wired everything together; 2 power cables to the motherboard, power cable to graphics card, SATA power cables to the hard drive and DVD drive, SATA cables between the mother board and the hard drive and DVD drive, and finally the case's supplied power button, USB cables, and audio cables. Oh I almost forgot about the two case supplied fans, the rear exhaust fan i connected to the case fan header on the motherboard and the front intake fan's cable was too short to reach the other fan header supplied on the board so I need to get an extender,or extend it myself.


I think I need to do some cable management...

Sunday, January 10, 2010

Mobo, CPU & ram

The next step is to install install the CPU and ram before the motherboard is put into the case. It just makes it a little easier.


Gigabyte P55A-UD3. Make sure to take static precautions, i.e. grounding wrist strap.


Intel Core i5 750 processor. Installing the CPU is fairly easy. Just have to line up the notches and keep the CPU level as you drop it in to make sure and not damage any of the pins in the socket.


Stock Intel heat sink install. Very easy to install. Just have to line up the pushpins with the holes in the board and push them through. Then connect the fan wires to the motherboards CPU fan connector. Also make sure the heatsink is snug and does not move as well as that the fan wires do not interfere with the fan.


Crucial 2 sticks of 2gig DDR3 1333 modules. Make sure to read the motherboard's instructions to identify which slots to install the ram into.

Thursday, January 7, 2010

Case & PSU

The first step in the construction is to prep the case for the installation of the components and install the power supply (PSU) into the case.


The case dismantled to allow access to all the insides.


This particular case has a fan opening in the bottom of the case so that the power supply can draw in fresh room temperature air to cool itself instead of air heated by the computers internals.


Power supply installed. Notice how it is modular although the motherboard power connectors cannot be removed from the supply.


The back with the power supply installed. Notice the two black circles on the case? I'm pretty sure those are for water cooling.
 

Wednesday, January 6, 2010

The Parts

My goal for this build (my first) was to make a decent computer to run CAD (Solid Works), video & picture editing, and play the most recent game releases on a 23" HP w2338h computer monitor.

The List:
  • CPU: Intel Core i5 750 ($150 @ microcenter)
  • MB: Gigabyte GA-P55A-UD3 ($135 @ newegg)
    • USB 3.0
    • SATA 3
  • GPU: MSI ATI Radeon HD 5770 seaweed edition ($165 @ newegg)
  • RAM: Crucial 2 x 2GB DDR3 1333 ($84 @ newegg)
  • HD: Western Digital Caviar Black 1TB ($100 @ newegg)
  • OD: SONY Optiarc Black 24x DVD+R...($32 @ newegg)
  • PSU: Corsair CMPSU-650HX ($130 @ newegg)
    • 650W
    • Modular
  • Case: Cooler Master Centurion 590 ($70 @ microcenter)


Ahhhhh what beautiful Christmas gifts!


Cheap case with lots of fan holes. Awesome!

Tuesday, January 5, 2010

My Computer Died

My first laptop, the poorly designed HP Pavilion zd8000, finally died after 5 years of abuse. Well, the computer still works its just that the darn power supply died for the 3rd time and it developed 3 pixel wide vertical lines on the screen. The one that came with the computer lasted for 3 years, then started smoking. The two replacement power supplies I acquired only lasted for one year each and subsequently overheated and started smoking. It was finally time to replace the aging single core Pentium 4 and severely outdated ATI GPU. So with the remaining battery life I dumped the contents of the hard drive onto an external one and parted ways.

One day I got bored and decided to dismantle the whole thing instead of selling it on Ebay. Hey I am an engineer what else would you expect? lol.